A Day in the Life of a Software Developer

8:30AM – Arrive at work

Hopefully, I arrive at work just in time for the first tea round – makes for a much better start to my day!

This time is usually used for catching up on emails and picking up where I left off yesterday. It’s useful to remind myself where I got to and try to achieve what I was in the middle of before stand up.

9:50AM – Stand up

This time is used to feedback to the team on my progress yesterday and what I intend to do today.

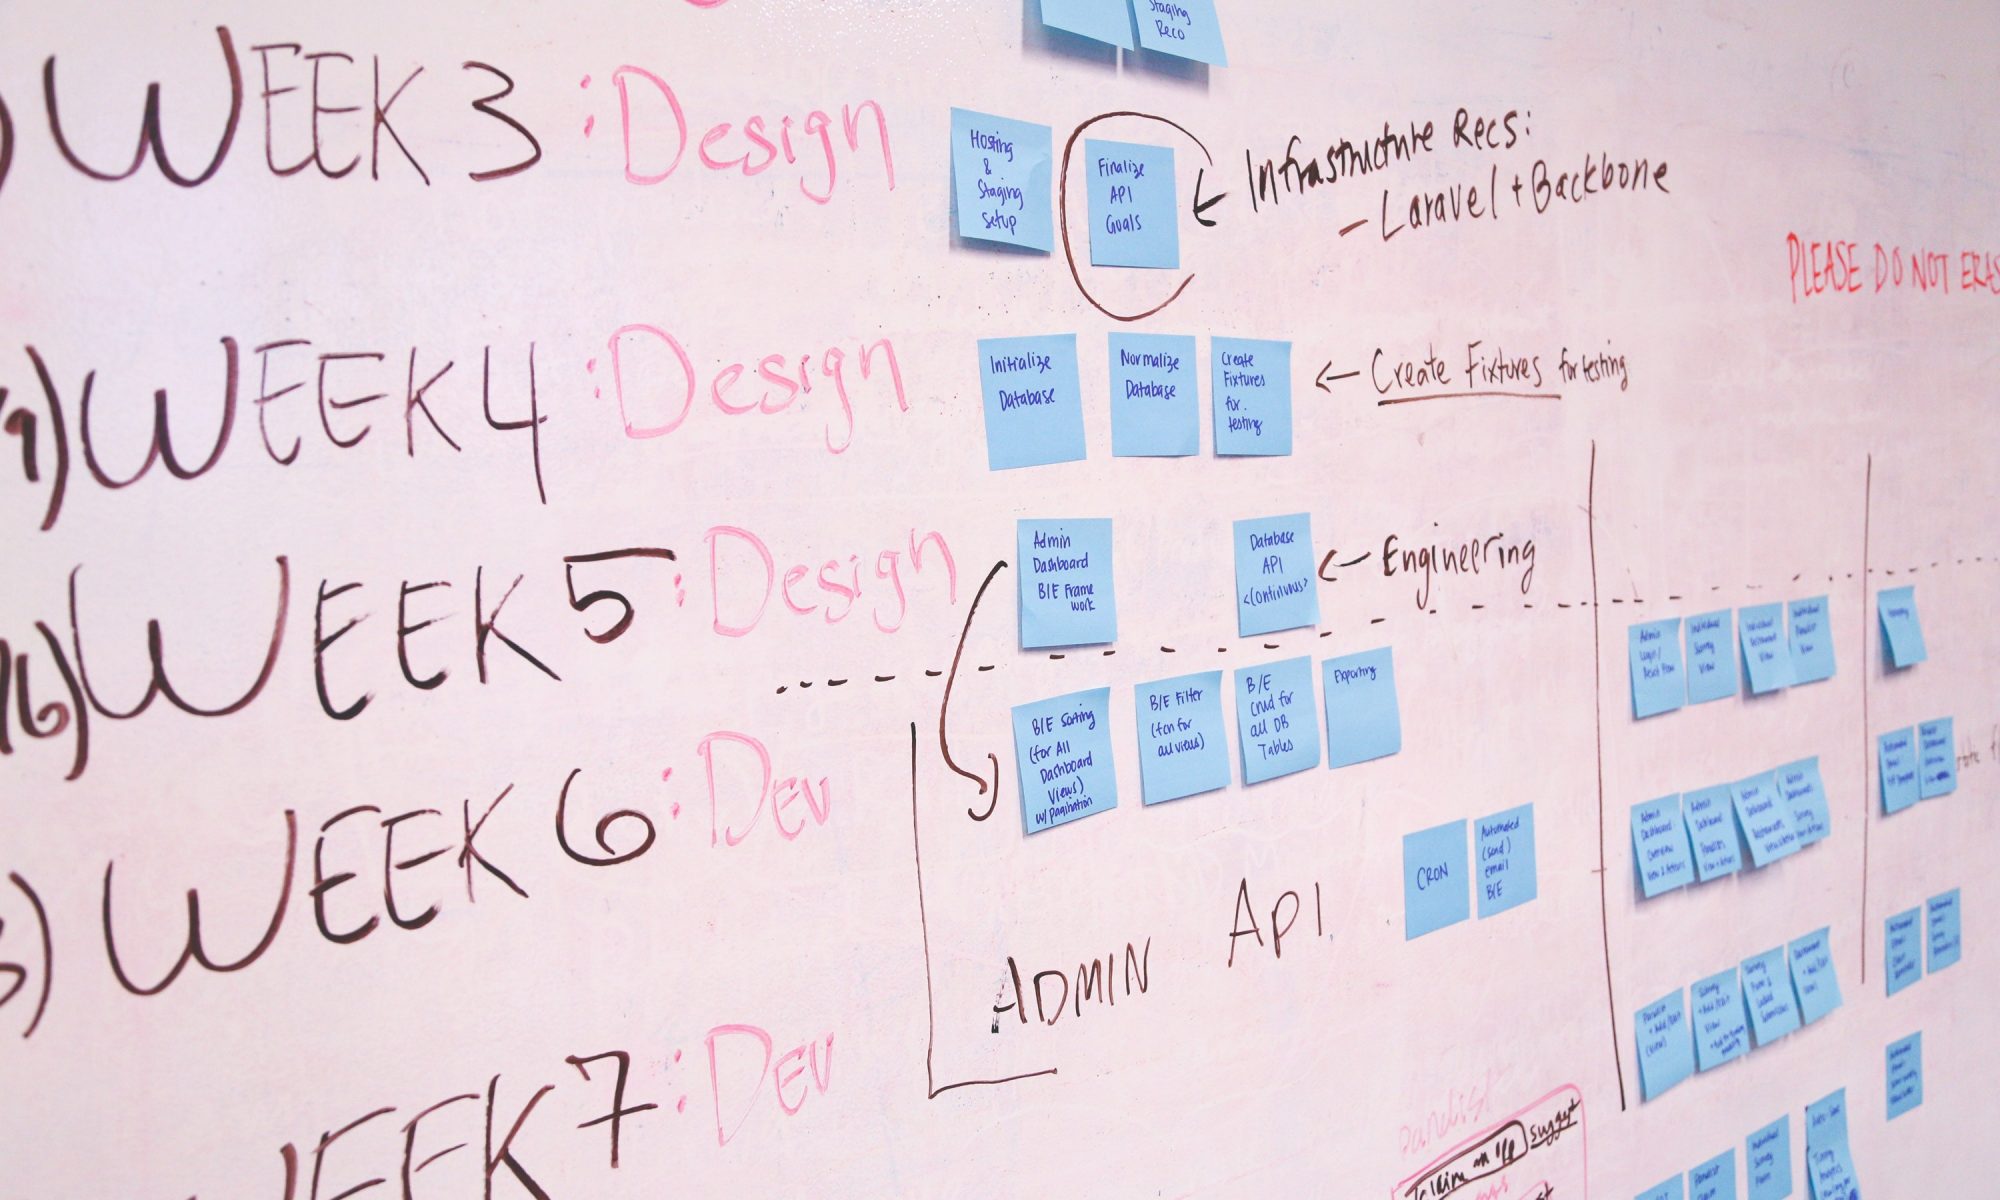
Now is a good time to pose any questions I have and to mention anything that may be blocking my work. For this stand up, it’s also time to look at the Kanban board for our project. This is something new our team is trying out, to see if we can get a better sight of what is being achieved during this project compared to other projects in the past. It is not without its pains but the general feeling is that it has been worthwhile to try out.

10:00AM – After stand up discussions

Since we’ve already been interrupted by stand up, now is the perfect time to discuss anything we have preying on our minds.

This can be anything from a simple user journey question to working together to overcome a problem. Today that means bringing our new team member up to speed with the project and what outstanding tasks I would like them to do first. I’m working on the front end of this project and would like a call for historical data to be completed so that I can progress further with my screen.

10:15AM – Time to get buried in code

Hoping for no more interruptions until lunch – it’s time for me to get knee deep in code.

Usually this involves working with legacy code and that is part of the battle! However, I am in the very fortunate position that this project is very greenfield. Whilst we are adding features to already existing functionality, our team have taken this opportunity to start fresh. A lot of the old code was done to an older standard, older ideas about the project and with older technologies in play. Now we can bring in newer technologies and our new way of doing things.

For instance, we are using Durandal for the new set of screens we are creating. Not only do we want this to feel like a one page application, but using Durandal helps us to modularise our front end code much better. All in all, this code will be much cleaner to work with in the future, and starting from scratch will benefit us greatly (plus it makes my job so much easier!).

12:30PM – Lunch

Time to get out of the office and clear my head.

Well sort of… Trips to lunch can easily turn into further discussion about problems we are facing in the project and how we might overcome them. It’s not a bad thing; it just shows how challenging the work can be and naturally you’ll want time to mull it over with someone.

1:30PM – Getting back to it

Now it’s time to get back to programming.

Today, I’m trying to not fiddle too much with the UI side of things. Instead, I want to get enough functionality into the screen so that I can complete at least one user journey. I’m working on what we’re calling a set up screen, which allows the user to set goals for their stores. This is by far the hardest screen in the project because there is just so much functionality, different possibilities and user journeys to consider. Now and then, I will come across a problem or a scenario that I want clarifying, but for the most part I am able to just get on with it.

Once I am satisfied that my JavaScript is working as it should, I try out a few quick scenarios. It doesn’t take me long to find an issue – unsurprising at this stage of development. This is the first time I will have called some of the controllers. In this instance it is on creation of a certain type of goal that’s brought up an error, so it’s time to take a look at the server side to sort out the problem.

5:15PM – Home Time

By the end of the day, I would have hoped to have got a big part of functionality done.

You can’t necessarily complete a Kanban task or sub task in a day, so I always try to give myself an aim for where I want to be with that task at the end of a day. While I try to leave my work at a good point to pick up for the next day, that doesn’t happen often.

Usually the time will honestly fly by and I am only reminded by others leaving that it is time for me to go.

Release Often, Reduce the Pain

Release management

Releases are painful.

That is a generally accepted “fact” in many parts of the software industry. Yet it needn’t be so.

Releases can be painful. If you release functionality in a “big bang” style, once per quarter approach, then don’t be surprised if the experience isn’t everything you’d hoped it would be.

Like anything in life, the more you do something, the more you learn, and the easier it becomes. Practice makes perfect. By the same vein, breaking big things up into small chunks often makes them easier.

Take running a marathon (uh oh, bad metaphor coming up…). If you run 26.2 miles in one go, then it’s hard work! If you run 26.2 miles every month, you’ll find it easier, but if you only do it once in a blue moon then chances are you’ll hit a wall at some point, pain will set in and you’ll wonder why on earth you signed up for this nonsense.

Take that same 26.2 miles though, and, let’s say, you run it in 4 parts. Run one part per week for 4 weeks and you’ve finished your marathon. Yes it took longer (did it?), but it was less painful right?

I said it took longer… but that’s not necessarily true. Perhaps you ran the last mile at around the same time you would have anyway, but you ran the first mile a month earlier because you didn’t feel you needed to train as hard or as long for the whole thing?

Because you were running in smaller chunks and resting inbetween, you probably also ran a bit faster. So you were running for less time overall!

To stretch the metaphor to its limit: you probably spent less time running and ‘delivered’ your first miles around 4 weeks earlier than you would have if you did it all in one go.

Still with me? OK, back to software…

By releasing smaller chunks of functionality more frequently, you are able to release them earlier, before everything else is ready to go.

Smaller releases generally take less time too. Because there’s less to push out, less to validate and check, and (in theory) less to go wrong.

Finally, through the act of releasing more often, you learn more about the process you go through, are less likely to make mistakes, and are probably more willing to put the effort in to streamline the process through more automation.

Overall, releasing little and often is a win for you, a win for your team, and most importantly a win for your product and your users.

Ralph Cooper, Head of Software Development

CI and Automated Deployments

Deployment

Automating deployments with TeamCity has saved us hours of headaches! Finding the setup that works best for us has taken some time, but now we’re there, the great mist that was hanging over web deployments has lifted and the world feels like a clearer, simpler place.

A few years ago, we were in a bad place.

We didn’t really know it yet, but we were definitely not set up for reliable, repeatable and scalable deployments. In fairness, what we had worked. With a relatively small team and not many applications, keeping on top of things wasn’t too onerous and generally there weren’t many mistakes.

Fast forward a few months and the system was seeing some growing pains. The development/test environment we experiencing contention, people overwriting each other’s changes and no one really knowing what version they were looking at. All deployments were manual, publishing from developer machines and copying the files. In today’s world though, this is practically a criminal offence! (It’s at least morally indefensible…)

Over the coming months and years we embarked on a journey of discovery. For some of us, the journey felt familiar – we’d covered much of the ground before – but for others it was a mysterious (and scary) voyage into the unknown. Today we’re in a better place, and here’s why…

We’re using git for source control.

Previously we had a large and unmanageable SVN repository. Moving to git was challenging, but in the end the benefits are proving to be well worth it. As things stand:

  • The single large repo is now many smaller ones
  • Managing code between branches (dev, release, feature, hotfix, master) is simple
  • Core modules are distributed using internal NuGet, dependencies are nicely managed
  • All repositories are centrally hosted using Stash

Continuous Integration (CI), is the first step for anyone towards salvation. We have TeamCity working hard validating that all our code in all branches builds once it’s checked in, giving us a confidence in our code base that we just didn’t have before. Additional steps run unit tests and create deployment packages. We also use features in TeamCity such as assembly versioning, to allow us to track which version of the code a particular DLL was built from.

Speed up and take out the human

Automating deployments speed up getting code into a working environment, and takes away the human element of deploying code. We have taken advantage of publish profiles and web deploy in Visual Studio and IIS to control where applications are deployed and with what configuration. Web.config transforms make managing multiple environment configurations a breeze, and you get consistent and reliable results. No more searching for hours to find that a setting wasn’t added to a particular web.config file!

Automating this much of the process has allowed us to create more environments, with better controls and clearer defined purposes. A test and production environment are fine in most cases, until you’re doing formal release testing and want to QA features that are for a future release. So we added another environment specifically for this purpose. Want an environment that’s more like production so you can do final validation checks before deploying? Easy, we created a staging environment.

All in all we now have 5 environments, all built from a specific code base:

Environment Built from Purpose
CI “dev” branch For developers to validate their changes with everyone else’s in an integrated environment
Test “dev” branch Owned by QA. For testing features that are in the current development iteration.
Release Verification “release/x.x” branch Owned by QA. For validating a release candidate. Only bug fixes relating to this release get deployed to this environment.
Staging “master” branch Owned by Infrastructure. Pre-live validation environment to perform final checks on a release before it’s deployed to production.
Production “master” branch The real deal

At first glance that’s a lot of environments, but thanks to automation the overheads are minimal compared to the benefits. Deployments are one click and take just a few minutes.

Streamlined Processes

Even so, we streamlined the process of creating new builds and environments. First of all, I want to say that TeamCity and Web Deploy are fantastic tools. If you’re not using them, you should be!

Creating a new set of environments is fairly straightforward. You do have to create the sites in IIS and point them to a place on the file system. You also have to set up the security correctly, but then that’s about it. Web deploy does the copying of files and the configuration side of things for you.

TeamCity allows you to create build configuration templates, which means new builds can be set up in just a few minutes. By selecting the template, then overriding a few parameters, your build is ready to go!

So, the scary part is clearly the production deployment, and there are some things you can do here to make it less scary:

  • Create a short MSBuild script to run before the deploy step that backs up the current production code to a known location. This means you can easily rollback if something’s gone wrong just by copying the files back into place.
  • Secure access to the production build configurations. There’s nothing worse than an accidental or unexpected deployment, and you can minimise the risk of this in TeamCity by having all your production deploy configurations in a separate project. This also means you can restrict access to just your infrastructure team, that way it’s impossible for developers to accidentally push changes into production without authorisation.

And that’s it! It took us quite a while to get here, and we’re by no means in a perfect place, but a lot of the stress and pain is now gone from validating and deploying our web projects. That means we can spend more time creating great products and less time worrying about deployments.

Ralph Cooper, Head of Software Development

A Day in the Life of Performance Tuning

Performance tuning

“Can I have all the things in instantly”?

“Make this slow thing fast”

“I want more, faster!”

Okay, yes, I am heinously boiling down the various questions we get asked for on a daily basis for comic effect, but in reality this is not far off the truth. You are about to get an insight into the journey I took to reduce a query from taking minutes to taking seconds.

Let’s start with the culprit;

DECLARE @startDate DATETIME = '2008-01-01',

        @endDate DATETIME = '2016-01-01'

BEGIN

       SELECT tdd.[Date Key],

              dbo.getDate(tdd.[Date Key])

       FROM [Date Dimension] tdd

       WHERE tdd.[Date] BETWEEN @startDate AND @endDate

END

It’s a simple snippet, it selects some keys from a table and passes one of those keys into a function to get another key between two dates.

It looks very innocent, nothing wrong here. One could ask a broader question about its usage in the scope on entire query but we are just going to take it in isolation here.

It looks innocent until you run it and find out that it takes 36 seconds!

Naturally my eye was drawn to the scalar function as at the moment it’s a black box and could be doing anything. I looked at it and determined that it was doing something reasonable but I could do it quicker.

DECLARE @startDate DATETIME = '2008-01-01',

        @endDate DATETIME = '2016-01-01'

BEGIN

       SELECT tdd.[Date Key],

       STUFF([Date Key], LEN([Date Key]) - 1, 2, '24')

       FROM [Date Dimension] tdd

       WHERE tdd.[Date] BETWEEN @startDate AND @endDate

END

Low and behold this returned its values 163 milliseconds! I went ahead and compared all the data and it matches as I expected it to. I wasn’t satisfied yet as while this is a great improvement, it is not entirely correct from a data point of view because I have assumptions about what is happening and the structure of data. I also needed to understand why this is quicker, without the understanding of why, you leave your code open to bugs and unforeseen interactions.

So next I asked the question; “Is it the scalar function call itself that’s the problem or is it the work the function is doing?” This directed me to create a function with the STUFF code within it. Creatively I called this “getDate2”.

DECLARE @startDate DATETIME = '2008-01-01',

        @endDate DATETIME = '2016-01-01'

BEGIN

       SELECT tdd.[Date Key],

              dbo.getDate2(tdd.[Date Key])

       FROM [Date Dimension] tdd

       WHERE tdd.[Date] BETWEEN @startDate AND @endDate

END

No joy. I had hoped it would be as simple as calling a scalar function multiple times was causing the problem but the execution plan and statistics tell me is isn’t with it executing in a measly 267ms. So we have to dig deeper. Let’s try in-lining the original function call statement with the method.

DECLARE @startDate DATETIME = '2008-01-01',

        @endDate DATETIME = '2016-01-01'

BEGIN

       SELECT tdd.[Date Key],

              (     

              SELECT tdd_day.[Date Key]

              FROM [Date Dimension] tdd_day

              WHERE tdd_day.[Date Key] = tdd.[Date Key]

              ) as Bleh

       FROM [Date Dimension] tdd

       WHERE tdd.[Date] BETWEEN @startDate AND @endDate

END

I was convinced that it would be this. In my mind doing this select for each result should be really slow but SQL server is smarter than I gave it credit for, it has looked ahead and created a plan that means it doesn’t have to do this. With this query returning its data in 163ms.

I was scratching my head at this point as the direct execution of a scalar function wasn’t slow and the direct execution of the work the scalar function was doing wasn’t slow. Maybe the scalar function has to interact with a table in some manner? So I created another function to do the same select as shown above but within a scalar function.

DECLARE @startDate DATETIME = '2008-01-01',

        @endDate DATETIME = '2016-01-01'

BEGIN

       SELECT tdd.[Date Key],

dbo.getDate4(tdd.[Date Key])

       FROM [Date Dimension] tdd

       WHERE tdd.[Date] BETWEEN @startDate AND @endDate

END

(With hindsight I didn’t need to do this because it’s the same as the original, but it was part of the process.)

At last! A result that shows the problem! This query took 22 seconds to return the results. So at this point it appears the SQL server truly treats scalar value functions as black boxes and this shows in the execution plan. The function call is in fact not shown.

It shows the estimated cost as 0 if you check the estimated plan but it is lying. The cost cannot and is not 0 as shown by all the above examples.

So what’s the answer? It’s not exactly good practise to just use the STUFF method. It makes various assumptions about how the data structure will continue to work and completely destroys any reusability we had before. Cue the entry of table valued functions!

Using a simple table valued function SQL can incorporate it into its plan. We can mimic the scalar function with a table valued function very simply by aggregating a result set with only one result in it.

SELECT MAX(tdd_day.[Date Key]) as [Date Key]

FROM   [Date Dimension] tdd_day

WHERE  tdd_day.[Date Key] = @transactionDateKey

We can then use the table valued function in place of our scalar function call;

DECLARE @startDate DATETIME = '2008-01-01',

        @endDate DATETIME = '2016-01-01'

BEGIN

       SELECT tdd.[Date Key], tdd2.[Date Key]

       FROM [Date Dimension] tdd

       CROSS APPLY dbo.GetDateForKey(tdd.[Date Key]) as tdd2

       WHERE tdd.[Date] BETWEEN @startDate AND @endDate

END

Looking at the execution plan we can now have visibility of the previous behaviour and how it’s been considered into the plan and it executes and returns its results in a cool 323ms down from the original 36 seconds, while maintaining a modicum of good coding principles as we are no longer forced to code in assumptions about structure or reusability failings.

The lessons to be learned here is never make assumptions, check everything. Although sometimes, when you don’t know what you don’t know, this can be hard…

Matt Bird, Developer

The True Cost of Bugs

software bugs

I’ve always known that there is a general rule that the sooner you find bugs the cheaper they are to expose and fix, with the converse being naturally true. But I had not really experienced it first-hand until now.

The experience has left me with some interesting “what-if” scenarios bouncing around my mind and none of them seem good when thought about as an avoided future possibility. So often we hear the dreaded turn of phrase “we are where we are”, so to be on the other side of that is a very nice feeling. A feeling which I will strive to replicate, which of course has led me to sharing this experience with you, the reader.

A quick search will quickly show a plethora of people showing graphics with exponential costs of finding bugs early compared to late so the following graphic will probably not be a surprise; costofbugs

So why do we allow ourselves to develop without any formal design or requirements? Why do we let ourselves release code into any environment without automated tests? Why do we allow ourselves to release code out of QA without confidence?

When you say those questions out loud it seems ridiculous to blame it on time (which is often the case), especially with the graph directly above it. You can quite clearly see that spending the time upfront will save you time later down the line even if you have to incur a smaller upfront cost. The problem here is that the time saved upfront is often forgotten about.

This is my call to every developer to at the very least highlight the cost next time the suggestion is made to shorten or circumvent one stage. This is also my call to every developer to make automated testing part of the development process and not some add-in extra that you do “if there is time”.

 Matt Bird, Developer

A GitFlow Model Without Dev Branch

Branches

Our team has decided to break away from the norm of having a Dev branch in our GitFlow branching model. Why you may ask. Well we found that the Dev branch just didn’t quite work for the way the team worked.

A branching model without Dev allows the team two vital things; we won’t be releasing features that we don’t want or aren’t ready, and as a team we understand what a release will contain, what features will be going out together. Consider the fact that in a branching model with a Dev branch, all development work is carried out on Dev or rather feature branches from Dev and merged back in. When these features are ready for release you can create a release branch from Dev with them and then start the process of releasing to production.

However with a team like ours that is much more release focused, we need to know that no features have made it into the Dev branch that we don’t wish to release and the team will have the knowledge to know what features will be going out in which release. Working with release branches and cutting out Dev working as some kind of middle ground means that our team can branch from either the last release or master, and merge in when required.

Removing the Dev branch has led to simplicity from a developer point of view, a developer will know their source of truth much better. A developer knows that in order to develop for the next feature all they need to do is branch from the latest release branch or the master branch. Whereas before the Dev branch can be quite far ahead, and it wouldn’t be a good idea to branch from there if the release needs to go out sooner than the features in Dev. And as mentioned before, developers have much more clear knowledge of what is going out with what, since nothing can be accidently brought in from Dev and future development.

Of course this model works for our team because of the way our team works, this isn’t a model that will be preferable all of the time. If we were to get to the position of releasing features when they are complete and have a continuous deployment process in place, suddenly there becomes a purpose for having a Dev branch and it would be desirable to have one.

Here’s an example of how we used GitFlow for our branching model before removing the Dev branch.

2017-08-02

An example of how our branching model works without a Dev branch.

2017-08-02-2


Indexes and Partitioning

Who is this article for?

This article is designed for people that are already familiar with SQL Server partitioning that want a deeper understanding of how indexing in partitioned tables works.

There are a lot of good articles regarding partitioning, how to create partition schemes and functions. One of my favourites is Brent Ozar that gives an easy introduction and contains links to more deep down resources.

Introduction

Indexes in partitioned tables can be divided into two subgroups:

  • Aligned
  • Unaligned

An aligned index, it’s an index that uses the same partition scheme and column as its table. SQL Server will align indexes for you unless you specify something different, like another partition scheme or filegroup.

The reasoning behind this feature, it’s that in general it’s better to have all the indexes aligned to be able to benefit from partition switching. A good starting point is as always msdn.

Let’s jump into code

First of all, let’s create a simple partitioned table in the heap with some records.

CREATE PARTITION FUNCTION PF_T1(INT) AS RANGE LEFT FOR VALUES (0,5,10)

CREATE PARTITION SCHEME PS_T1 AS PARTITION PF_T1 TO ([SECONDARY],[F1],[F2],[F3])

CREATE TABLE T1(
       ID INT IDENTITY(1,1),
       PartitionKey INT NOT NULL
)ON PS_T1(PartitionKey)

INSERT INTO T1(PartitionKey) VALUES (0),(4),(5),(7),(8),(11),(12),(13)

Now, let’s see where our data is to start with.

EXEC dbo.SeePartitions 'T1'

jsblog

No surprises here, we are in the heap using the Partition Scheme. Now that we know where we are let’s play with some clustered indexes. Let’s start by something simple, a clustered non unique index on the partitioned column.

CREATE CLUSTERED INDEX T1_clustered
   ON T1 (PartitionKey)

EXEC dbo.SeePartitions 'T1'

jsblog1

If we take a look to the index, no surprises either, it’s aligned using the Partition Scheme.

EXEC dbo.SeeIndex 'T1_clustered'

jsblog2


Let’s drop the previous index and check the results.

DROP INDEX T1_clustered ON T1

EXEC dbo.SeePartitions 'T1'

jsblog3


So we are back on the heap.

CREATE CLUSTERED INDEX T1_clustered
   ON T1 (ID)

EXEC dbo.SeePartitions 'T1'

EXEC dbo.SeeIndex 'T1_clustered'

jsblog4

What has happened there? Why does my index have two columns when I specified only one? If you take a closer look to the statement, we are creating the index on column “ID” not on the “PartitionKey”, that is not the column our table is partitioned on. As mentioned before, SQL Server will try to keep our indexes aligned unless we are very explicit about it and we tell it not to. Microsoft documentation states:

“When partitioning a nonunique clustered index, and the partitioning column is not explicitly specified in the clustering key, SQL Server adds the partitioning column by default to the list of clustered index keys.”

Now, if you look at that index in SSMS you will see that that column is not in the General tab, but it is specified in the Storage tab.

jsblog5

If you click “Script”, you will see what SQL Server has done behind the scenes.

CREATE CLUSTERED INDEX [T1_clustered] ON [dbo].[T1]
(
       [ID] ASC
) ON [PS_T1]([PartitionKey])

Ok, let’s drop the previous index and create a new one.

DROP INDEX T1_clustered ON T1

CREATE UNIQUE CLUSTERED INDEX T1_clustered
   ON T1 (ID)

jsblog6

We get a really good error, it means that the “PartitionKey” needs to be explicitly in the index because our index is unique. Ok, so let’s add it.

CREATE UNIQUE CLUSTERED INDEX T1_clustered
   ON T1 (ID, PartitionKey)

EXEC dbo.SeePartitions 'T1'

EXEC dbo.SeeIndex 'T1_clustered'

jsblog7

The above behaviour is the same for nonclustered indexes so, what if I do know what I’m doing and I really don’t want to have my indexes aligned. In that case you need to be explicit about the filegroup you want the index to live in.

CREATE UNIQUE NONCLUSTERED INDEX T1_nonclustered
   ON T1 (ID)
   ON [PRIMARY]

jsbog8

Conclusions

SQL server tries really hard to keep your indexes aligned for a very good reason, unaligned indexes will have a very painful consequence: switching partitions won’t be possible.

There are very few scenarios where performance can be improved by having unaligned indexes, like calculating a MAX without filtering by the partition key, a really good article can be found here, but rarely the benefits outweighs the cost.

Complexity, often not required!

Complexity, this topic is one I find myself coming back to on a daily basis. Good and functional code does not have to be the same thing as complex code! I found a lovely example of this today.

The problem is simple; Establish a way to link Team City builds to a deployed APK or IPA.

Searching the internet showed me that this is a prime example of over-engineering at its best, with build runners flying around here and plugins flying around there. Not required!! All you need is a simple understanding of how Cordova links its version to its generated .APK or .IPA and a way to interact with this.

The config.xml file has a section in it called widget. It contains an attribute called version.

One simple Team City build step that runs a powershell script which alters this value to your desired build number before the build process generates your install files and you have a version linked to a build for all the generated outputs you just produced.

[xml] $xml = Get-Content './config.xml'
 $xml.widget.version = $version
 $xml.Save($path);

Every build process will have a way to track build numbers. So just pass in your build version in the format Major.Minor.Build and you’re all set.

Simple.

Matthew Bird, Senior Developer